
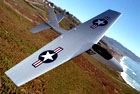
A Review of Building and Flying the Sidewinder
 If you manage to find yourself lucky enough to get your hands on a Sidewinder EPP kit, here's some construction tips that you
might find useful:
If you manage to find yourself lucky enough to get your hands on a Sidewinder EPP kit, here's some construction tips that you
might find useful:
The Sidewinder EPP's instructions are very good, they have diagrams to ease in your understanding about what goes where, and the overall kit quality is excellent! It's a great kit and something you can start building and fly in about a week's time of just working on the plane in the evenings.
The Sidewinder doesn't come with a push rod for the elevator linkage, but it does have all the other hardware you need (like control horns and aileron linkages).
I suggest using Gold-N-Rod 'Blue' for the elevator push rod instead of using steel rods with sleeves. Expect the tail to get hit hard during some intense combat 'sessions' and usually what happens is the steel-type rods will bend and eventually start to bind. I didn't have of the blue rods myself, so I used the more flexible red ones. Since the servo to elevator run is completely straight, having an extra flexible rod (the red rods) doesn't help here, and I think the stiffer blue ones should be used if you have a choice. In order to get the elevator control horn in the 'right' place, I recommend temporarily taping the horn to the elevator and then taping the elevator pushrod to the fuselage to see if you're at all within 'range' of the horn. I made a mistake the first time by not giving clearance for movement of the horn and pushrod. Don't do this. I also recommend putting some mylar packing tape on the top of the Coroplast hinge to give the hinge some added strength for those 'wham-bam' attacks by your friends.
Something that's not mentioned in the kit instructions is a place to put the antenna wire coming from the receiver. I recommend installing a small plastic tube in the opposite side of the fuselage (from where you put the elevator pushrod). You can use a piece of nyrod or Gold-N-Rod or equivalent. Cut a thin slot in the side of the fuselage, lightly glue in the tube, and slide the antenna down inside of the tube. If you use a tube, it'll be a lot easier later to change or replace the receiver (I changed the RX twice just during the construction).
When installing servo connections to the ailerons of the Sidewinder, I recommend using servo 'wheels' rather than arms as I'll bet you'll be able to break off the servo 'arm' type. (Or use those 'heavy duty' arms if you can.) Been there, done that!
I definitely recommend the 2-servo aileron setup that's mentioned in the manual as it'll give you the chance to setup a mix of elevator and flapperons together to really improve on the Sidewinder's inverted performance. Of course, this requires a computer radio to do that. If you don't have one, that's fine, you can still connect the 2 servos together with a 'Y-connector' and use your standard radio, you won't get flapperons, but you probably won't care that much as you 'down' your fellow flyers.
The tail surfaces are made of Coroplast (corrugated plastic sheet), so I don't recommend trying to cover the tail 'feathers' with Ultracote covering as it just tends to wrinkle and look bad. I just put some colored mylar tape around the edges of the Sidewinder fins and horizontal stabilizers to cover the 'holes' in the Coroplast. You can also use trim covering (self-stick stuff).
Don't put servos designed for handlaunch sailplanes in this airplane. The weight just isn't going to matter that much, and those little tiny servos are a lot easier to 'strip'. Just get the standard servos (Futaba 148 or 3003, or something like that). The standard servos are cheap and durable. This is especially true for the elevator. For some reason, the elevator servo is going to be the one that strips if you put in a weak one. I put in a smaller DAD Tina servo 'cuz I had one and, yup, I stripped it (probably not during a combat session though).
You can build the Sidewinder in a week of evenings. I know, I did it. It's definitely not what I would give to someone as a first plane, but it's still in the 'Novice' category as far as knowledge of construction techniques needed. The hardest thing is just getting the controls all straightened out. What I recommend is that you don't permanently glue in the servos until you're essentially done with the construction. This way, if you've 'messed up' and mis-measured the links for the ailerons, etc. You still can get those servos in-and-out until it's 'right'.
The instructions are clear and the diagrams help visualize what and how the Sidewinder is assembled. With only some tubes of 12-minute epoxy, strapping tape, a bit of silicon RTV adhesive or ShoeGoo, and a pushrod tube you can assemble the Sidewinder. The hardest part about the Sidewinder was deciding on which color scheme to do!
The Sidewinder is a great flying airplane! I used a computer radio to couple in flapperons with the elevator movement which gives quite an edge when doing loops or flying inverted. This can help immensely when you get knocked upside down in a 'battle' in the air and the only way out is to continue flying inverted to avoid hitting the hill. I was able to knock quite a few other planes out of the air as well. The Sidewinder is not a wimpy airplane, rather it carries some beef along with it.
If you want to really show your combat 'strength' on the local slope, find a Sidewinder EPP (somewhere).