- Home
- Iso-Thixotropy
- Air Pressure
- Airplanes
- Cartesian Diver
- Slime
- Sound
- Links


Airplanes (Paper)
This experiment is to help understand the mechanics of flight.
Materials
- Sheets of paper such as copier or computer printer paper
- Some 1/2" or 3/4" cellophane tape
- Some paper clips
- Copies of the "Bernoulli Plane" template so you can make several planes and experiment with different ways of making them fly
 Procedure
Build a special paper airplane to demonstrate how airplane wings work and
how most birds can fly (when they're not flapping their wings).
Click Bernoulli Plane Template to see and print the airplane.
Cut out the airplane's shape along the dark solid line. Next, fold the top
half at the "D-line" line so that it meets the bottom half where the A-B-C's are.
However, don't fully crease the paper at the fold (we want to make a nice 'tear drop' airfoil shape).
 After folding the paper back, put a small piece of tape at the wing tips and at the
center at the points marked A, B, and C. Now fold the plane along the center
crease so that it creates a flattened out 'V'. The angle of the 'V' should be no
more than about 15 degrees.
After folding the paper back, put a small piece of tape at the wing tips and at the
center at the points marked A, B, and C. Now fold the plane along the center
crease so that it creates a flattened out 'V'. The angle of the 'V' should be no
more than about 15 degrees.
Test fly the plane and adjust its stability by bending or smoothing out the paper. Keep
the nose of the plane from rising (stalling) by adding a small weight to the front or nose.
A paper clip or just some extra tape near the nose does nicely. You can also adjust how much the plane
dives or climbs by cutting small slots in the tail of the plane and bending the paper
at the cuts up or down. Experiment with putting them up or down and seeing what
effect that has on the way the plane flies. People who know about airplanes call those
little 'tabs' an elevator
if it makes the plane go up or down and a rudder
if it makes the plane turn right or left.
 What's Going On?
Well, for many years as an avid modeler, I believed, incorrectly, that the majority of lift created
by a wing passing thru air was due to a principle known as Bernoulli's Principle.
The summary of Bernoulli's Principle is: "...as air travels faster
[than surrounding air] across a surface, the air pressure against it is reduced...". What that means is
that the air pressure where air travels faster drops, literally "sucking" that surface at that point.
This notion also includes the statement that says that the air passing above
the wing surface must meet the air passing below at the same time. And this implies
that if you curve the top of an airplane wing so that the distance along the top surface
is longer than the bottom, that the air must move faster (to meet a the trailing
edge of the wing), thereby satifying Bernoulli's Principle.
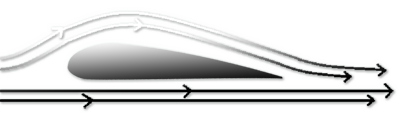
Unfortunately, only a few percent of the total lift of a wing is created from
this "speeding up" of the air passing over the wing. The Bernoulli Principle is valid, but is NOT the
reason why most planes fly. And using this description of creation
of lift doesn't explain how planes can fly upside-down or how a plane's lift
changes as the "angle of attack" of the wing changes. (It's Newton's Effect that is really at work - the same effect
as when you are traveling in a fast moving car and you put your hand out into the passing air and direct
your hand up and down, tilting it like a wing.)
Even with all of this information, I still believe that the "Bernoulli Plane" is a good project to demonstrate
how some planes fly and to help explain airfoils are used in airplanes.
Mess Factor
Scraps of paper all over the floor as we cut out the plane(s).
 Things to Remember
Bernoulli's Principle is a relation discovered by the 18th-century Swiss
scientist and mathematician Daniel Bernoulli. He discovered that the faster
a fluid (such as air) moves, the lower is the pressure that it exerts.
This material can be found in more detail in "Understanding Flight",
by David Anderson and Scott Eberhardt, McGraw-Hill, 2001, ISBN: 0-07-136377-7.